
iOS: Firebase Authentication using Email and Password
A Step-by-Step Guide to Implementing Firebase Authentication with Email and Password on iOS


In this blog, we'll explore Firebase Authentication to implement a straightforward email-password sign-in process within the iOS app. Let's get started and understand the process of signing in with email and password!
Setting Up Firebase
Before diving into email-password authentication, we need to set up Firebase in our project. If you haven't done so already, refer to my earlier blog for a step-by-step walkthrough on iOS Firebase integration:
Enabling Authentication
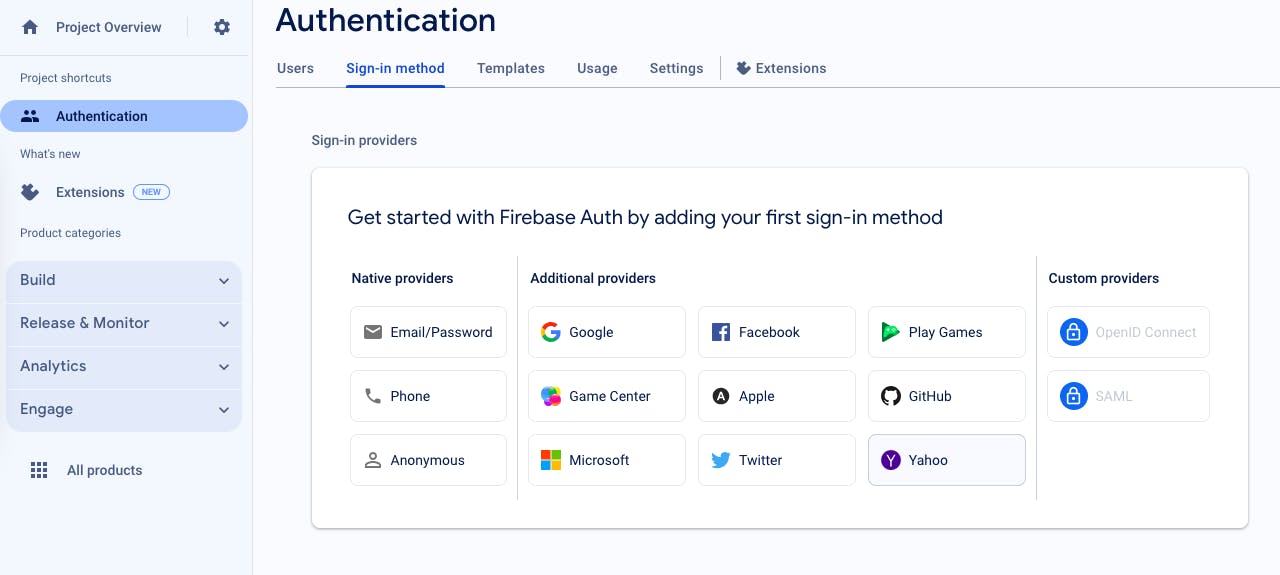
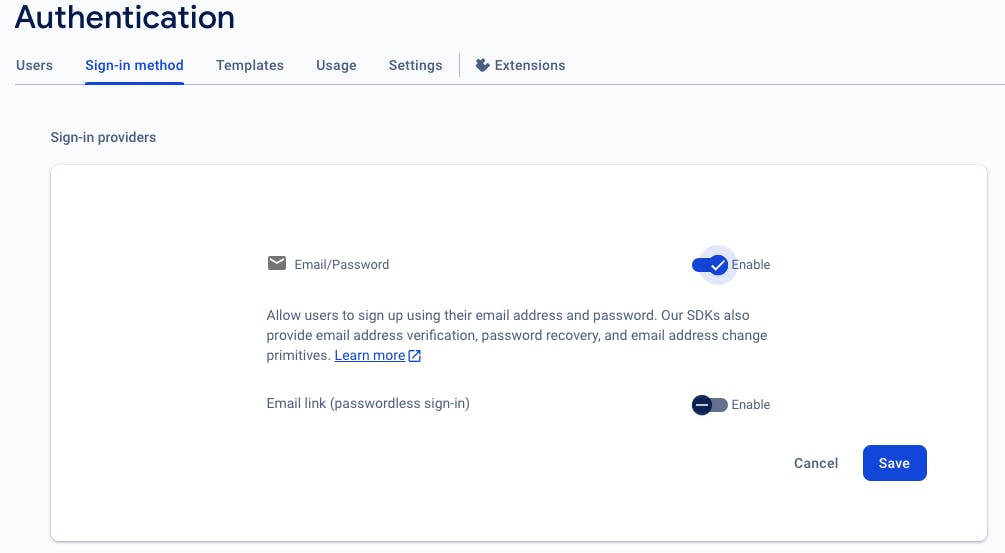
In the "Authentication" section, navigate to the "Sign-in method" tab. Locate the "Email/Password" sign-in provider and toggle it to enable. Remember to save the changes.
In Firebase Console, go to the "Build" section and click on "Authentication." If prompted, tap on "Get Started" to begin setup.
API key: This key is important for configuring Firebase within the iOS app. Head over to the Firebase Console's "Project settings" by clicking on the gear icon. Within the "General" tab, you'll find your project's API key.
Implementing Email-Password Authentication
Now that Firebase is set up in our project, let's focus on integrating Firebase authentication and writing the necessary code for user sign-up, sign-in, and error handling. We'll create an AuthManager class to handle all authentication-related tasks and manage the user's authentication state.
Creating the AuthManager Class
import SwiftUI
import FirebaseAuth

class AuthManager: NSObject, ObservableObject {

    // MARK: - Properties

    @Published var isUserLoggedIn = false

    // MARK: - Initialization

    override init() {
        super.init()
        setupAuthStateChangeListener()
    }

    // MARK: - Methods

    // MARK: Auth State Change Listener

    /// Sets up the authentication state change listener to track user login status.
    private func setupAuthStateChangeListener() {
        Auth.auth().addStateDidChangeListener { [weak self] auth, user in
            guard let self = self else { return }
            DispatchQueue.main.asyncAfter(deadline: .now() + 1.0) {
                self.isUserLoggedIn = user != nil
            }
        }
    }

    // MARK: Sign Out

    /// Signs out the current user.
    /// - Parameter completion: Closure called upon completion with an optional error.
    func signOut(completion: @escaping (Error?) -> Void) {
        do {
            try Auth.auth().signOut()
            completion(nil)
        } catch let signOutError as NSError {
            completion(signOutError)
        }
    }
}

// MARK: - Account Creation and Sign In

extension AuthManager {

    // MARK: Create Account

    /// Creates a new user account with the provided email and password.
    /// - Parameters:
    ///   - email: User's email address.
    ///   - password: User's desired password.
    ///   - completion: Closure called upon completion with an optional error.
    func createAccount(withEmail email: String, password: String, completion: @escaping (Error?) -> Void) {
        Auth.auth().createUser(withEmail: email, password: password) { authResult, error in
            if let error = error {
                completion(error)
            } else {
                completion(nil)
            }
        }
    }

    // MARK: Sign In with Email and Password

    /// Signs in the user with the provided email and password.
    /// - Parameters:
    ///   - email: User's email address.
    ///   - password: User's password.
    ///   - completion: Closure called upon completion with an optional error.
    func signInWithEmail(withEmail email: String, password: String, completion: @escaping (Error?) -> Void) {
        Auth.auth().signIn(withEmail: email, password: password) { authResult, error in
            if let error = error {
                completion(error)
            } else {
                completion(nil)
            }
        }
    }
}
Integrating AuthManager into SwiftUI Views
Now, let's integrate this AuthManager class for sign-in, sign-up, and sign-out functionality.
1. YourApp.swift
import SwiftUI

@main
struct YourApp: App {

    // MARK: - Properties

    @StateObject private var authManager = AuthManager()

    // MARK: - Body

    var body: some Scene {
        WindowGroup {
            NavigationView {
                if authManager.isUserLoggedIn {
                    HomeView()
                        .environmentObject(authManager)
                } else {
                    SignInView()
                        .environmentObject(authManager)
                }
            }
        }
    }
}
2. SignInView.swift
struct SignInView: View {

    // MARK: - Properties

    @EnvironmentObject var authManager: AuthManager
    @State private var email = ""
    @State private var password = ""
    @State private var isSigningIn = false

    // MARK: - Body

    var body: some View {
        VStack {
            // Email Text Field
            TextField("Email", text: $email)
                .textFieldStyle(RoundedBorderTextFieldStyle())

            // Password Secure Field
            SecureField("Password", text: $password)
                .textFieldStyle(RoundedBorderTextFieldStyle())

            // Sign In Button
            Button(action: {
                isSigningIn = true
                authManager.signInWithEmail(withEmail: email, password: password, completion: { error in
                    handleAuthenticationResult(error)
                    isSigningIn = false
                })
            }) {
                if isSigningIn {
                    ProgressView()
                } else {
                    Text("Sign In")
                }
            }
            .frame(width: 200, height: 40)
            .background(Color.black)
            .padding(.vertical, 20)

            // Navigation Link to SignUpView
            NavigationLink(destination: SignUpView(), label: {
                Text("Don't have an account? Sign Up")
                    .foregroundColor(.blue)
            })
        }
        .padding(.horizontal, 10)
        .navigationTitle("Sign In")
    }

    // MARK: - Handle Authentication Result

    private func handleAuthenticationResult(_ error: Error?) {
        if let error = error {
            // Handle sign-in error
            print("Sign-in error: \(error.localizedDescription)")
        } else {
            print("Signed in successfully!")
        }
        // Show result
    }
}

// MARK: - Preview

struct SignInView_Previews: PreviewProvider {
    static var previews: some View {
        SignInView()
    }
}
3. SignUpView.swift
struct SignUpView: View {

    // MARK: - Properties

    @EnvironmentObject var authManager: AuthManager
    @Environment(\.presentationMode) var presentationMode
    @State private var email = ""
    @State private var password = ""
    @State private var isSigningUp = false

    // MARK: - Body

    var body: some View {
        VStack {
            // Email Text Field
            TextField("Email", text: $email)
                .textFieldStyle(RoundedBorderTextFieldStyle())

            // Password Secure Field
            SecureField("Password", text: $password)
                .textFieldStyle(RoundedBorderTextFieldStyle())

            // Sign Up Button
            Button(action: {
                isSigningUp = true
                authManager.createAccount(withEmail: email, password: password, completion: { error in
                    handleAuthenticationResult(error)
                    isSigningUp = false
                })
            }) {
                if isSigningUp {
                    ProgressView()
                } else {
                    Text("Sign Up")
                }
            }
            .frame(width: 200, height: 40)
            .background(Color.black)
            .padding(.vertical, 20)

            // Navigate back to SignInView
            Text("Already have an account? Sign In")
                .foregroundColor(.blue)
                .onTapGesture {
                    presentationMode.wrappedValue.dismiss()
                }
        }
        .padding(.horizontal, 10)
        .navigationTitle("Sign Up")
    }

    // MARK: - Handle Authentication Result

    private func handleAuthenticationResult(_ error: Error?) {
        if let error = error {
            print("Sign-up error: \(error.localizedDescription)")
            // Show error
        } else {
            print("Signed up successfully!")
        }
        // Show result
    }
}

// MARK: - Preview

struct SignUpView_Previews: PreviewProvider {
    static var previews: some View {
        SignUpView()
    }
}
4. HomeView.swift
struct HomeView: View {

    // MARK: - Properties

    @EnvironmentObject var authManager: AuthManager

    // MARK: - Body

    var body: some View {
        VStack {
            Text("Welcome to Your App!")

            // Sign Out Button
            Button("Sign Out") {
                authManager.signOut { error in
                    if let error = error {
                        print("Sign-out error: \(error.localizedDescription)")
                        // Show error
                    }
                }
            }
            .frame(width: 200, height: 40)
            .background(Color.black)
            .padding(.vertical, 20)
        }
        .padding(.horizontal, 10)
        .navigationTitle("Home")
    }
}

// MARK: - Preview

struct HomeView_Previews: PreviewProvider {
    static var previews: some View {
        HomeView()
    }
}
With these implementations, we now have simple SwiftUI views. YourApp.swift smoothly manages navigation based on whether the user is signed in or not. SignInView, SignUpView, and HomeView utilize the AuthManager to handle user actions like signing in, signing up, and signing out. The AuthManager keeps track of the user's authentication status across the entire app.
Additionally, it's important to enhance the user experience further by implementing proper validations for input fields. This ensures that users enter valid information and receive immediate feedback if there are any errors. Furthermore, integrating loading states into the UI enhances transparency and responsiveness, keeping users informed during authentication processes.
Security Measures
Security is essential in any application, especially when handling user authentication.
1. Secure Password Practices
When dealing with user passwords, encourage users to create strong, unique passwords. Store passwords securely using cryptographic hash functions.
2. Enabling Firebase Security Rules
Firebase allows you to define security rules to control access to your data. Configure security rules to restrict unauthorized access to your authentication data. Firebase security rules are written in a simple JSON-like language and can be customized according to your app's needs.
{
  "rules": {
    ".read": "auth != null",
    ".write": "auth != null",
    "users": {
      "$uid": {
        ".read": "$uid === auth.uid",
        ".write": "$uid === auth.uid"
      }
    }
  }
}
By enforcing strict security rules, we add an extra layer of protection to our Firebase authentication system.
Handling Password Resets
Include a "Forgot Password" feature in your app. Allow users to reset their passwords through a secure process. Firebase provides a built-in password reset function:
Auth.auth().sendPasswordReset(withEmail: email) { error in
    if let error = error {
        print("Password reset error: \(error.localizedDescription)")
    } else {
        print("Password reset email sent successfully.")
    }
}
Provide clear instructions for users on the password recovery process. Consider sending a confirmation email to ensure the security of the password reset request. Guide users through the steps, emphasizing the importance of using a strong and unique password.
Conclusion
This blog covers the key steps to implement email password authentication with Firebase in a SwiftUI app. By prioritizing security measures, handling password resets effectively, and incorporating seamless user experience practices, developers can create robust authentication systems.
Note*: Firebase evolves, and new features are added. Stay informed by checking the official documentation regularly.*
References
Thanks for reading! 🚀 If you found this helpful, give it a like and share with others. Stay tuned for more blogs!
Happy coding! 👩🏻💻✨